
Mautic is super powerful when it comes to tracking anything on your own website, or any other website in fact. It is pretty brilliand if you want to track email opens and clicks. But sometimes it is just not enough. Sometimes you want to track events in other email software, and push in openers into Mautic. This is when you need the Mighty Pixel.
This tutorial will be super technical, so if you are not familiar with php, you might loose the track at one point. If this is the case, just hit me up, and I’ll set you up in a jiffy.
Case #1: Push openers to Mautic

Let’s say you have a list in Mailchimp, but you would like to move away from that service and push all active contacts to Mautic. The Mighty Pixel will do just that for you.
This is how it works:
- Place a pixel in the emails in Mailchimp (or aWeber, or ActiveCampaign, or Gmail, it doesn’t matter.) and use the tokens for personalizing the link.
- Use the Mighty Pixel script to capture the data
- Push the data into your Mautic.
Case #2: Start automation in Mautic based on third party email opens
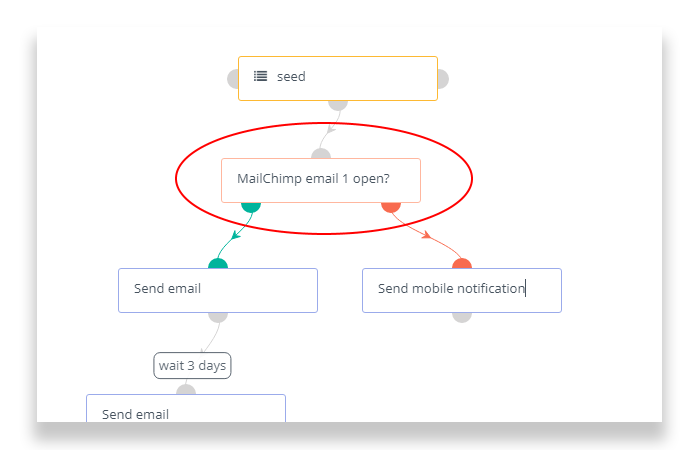
This is how it works:
- Place a pixel in the emails in the third party email service and use the tokens for personalizing the link.
- Use the Mighty Pixel script to capture the data
- Push the data into your Mautic, and make sure you use a tag or other identifier to push the contacts into the segment.
- The segment starts or modifies the campaign.
Let’s build it!
You can download the whole script by registering here (free), or by logging in into your download area.
My mighty pixel script will live on my Mautic server to make things easier, but you can place it really anywhere. Make sure you enable basic http auth in the settings and clear your cache before going forward.
Let’s say my Mautic is installed on https://mymautic.joeykeller.com and I will use the /px/ folder for keeping the files.
They’ll look like this after unzip:

Okay, let’s go through the files to learn what each of them does:
- .htaccess
This file is responsible about making our links pretty. We won’t use parameters in the URL of our image, just slashes, like https://mymautic.joeykeller.com/px/joey@whatever.com/Joey/Keller - px.png
This is our dummy pixel. We won’t really use it, but it has to be there. Let’s leave it like that. - index.php
This script does the heavy lifting, I’m gonna take it apart in the next part. It has to be index.php, because other files cannot be run thanks to our very serious Apache settings. Are you using Nginx? Well, you’ll need to modify your scripts… - pixel.log:
This is just for logging purposes. Remember: logging is good for the soul.
The Magic is done by index.php
Let me guide you through this index.php, so you can do all modification, you might need.
function printLog($str)
{
  file_put_contents( 'pixel.log', $str."\n", FILE_APPEND | LOCK_EX );
}
This is where we log. Thats it.
$query = $_SERVER['REQUEST_URI'];
$route = explode('/',$_SERVER['REQUEST_URI']);
This part explodes our URL route apart, if we made it pretty. Remember the my words: “EXPLODED”!
function open_image ($file) {
    //detect type and process accordinally
    global $type;
    $size=getimagesize($file);
    switch($size["mime"]){
        case "image/jpeg":
            $im = imagecreatefromjpeg($file); //jpeg file
        break;
        case "image/gif":
            $im = imagecreatefromgif($file); //gif file
      break;
      case "image/png":
          $im = imagecreatefrompng($file); //png file
      break;
    default:
        $im=false;
    break;
    }
    return $im;
}
This function will display the image itself. You don’t need to touch it.
	$file = 'px.png';

	$size = getimagesize($file);
	header('Content-Type: '.$size['mime']);

	$jpg_image = open_image($file);
	imagepng($jpg_image);
	imagedestroy($jpg_image);
This part will show the image itself. You won’t need to change it either 🙂
//log some info
printLog(date('Y-m-d H:i:s'));
printLog('Remote Address: '.$_SERVER['REMOTE_ADDR']);
Logging magic in action. You can also change the log in such a way, that you create an uploadable CSV file for later. It’s up to you.
if (isset($route[2])) {
  printLog('email: '.$route[2]);
}
if (isset($route[3])) {
  printLog('Firstname: '.$route[3]);
}
if (isset($route[4])) {
  printLog('Lastname: '.$route[4]);
}
if (isset($route[5])) {
  printLog('tag: '.$route[5]);
}
This part starts to be interesting. Remember how we exploded the URL path above? Now we will make sense of each part.
Our exploded route array looks like this:

$loginname = '';
// Loginname of your API user
$password = '';
// This is the password of the API user
$siteurl = '';
// example: mymautic.com

$curl = curl_init();
// Set some options - we are passing in a user agent too here
  curl_setopt_array($curl, array(
  CURLOPT_RETURNTRANSFER => 1,
  CURLOPT_URL => "https://".$loginname.":".$password."@".$siteurl."/api/contacts/new",
  CURLOPT_USERAGENT => 'Mautic Connector',
  CURLOPT_POST => 1,
// posting the payload
  CURLOPT_POSTFIELDS => array(
    'firstname' => $route[3],
    'lastname' => $route[4],
    'email' => $route[2],
    'tags' => $route[5]
  )
));
curl_exec($curl);
This code piece is the standard api call we need to add or update a contact in Mautic. Make sure you are adding the right data for login, psw and url.
Testing time.
We can create a simple html file, that shows nothing else but an image. If the image is shown, then the person should be added in Mautic. Here is an example test file:
<html>
<head>
</head>
<body>
Test 1x1 Mightly Tracking pixel is fired
<img src="https://mymautic.joeykeller.com/px/testdude@test.com/TestFN/TestLN/seed">
</body>
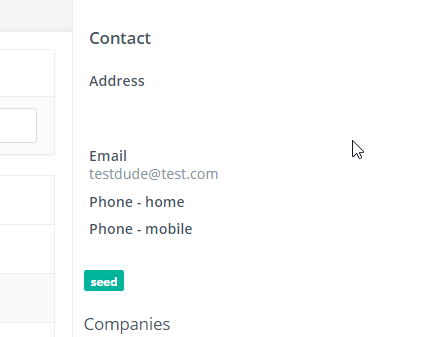
</html>Save this file anywhere, and open it via the internet. If our script works, the person will be created (or updated if he is already there) in Mautic:

And the tag is also beautifully added:
Adding the tracking pixel
This is the last step to our Tracking – Nirvana.
We need to be able to use the email system’s tokens to generate the image URL and add it in the code.
In case of Mailchimp, it looks like this:
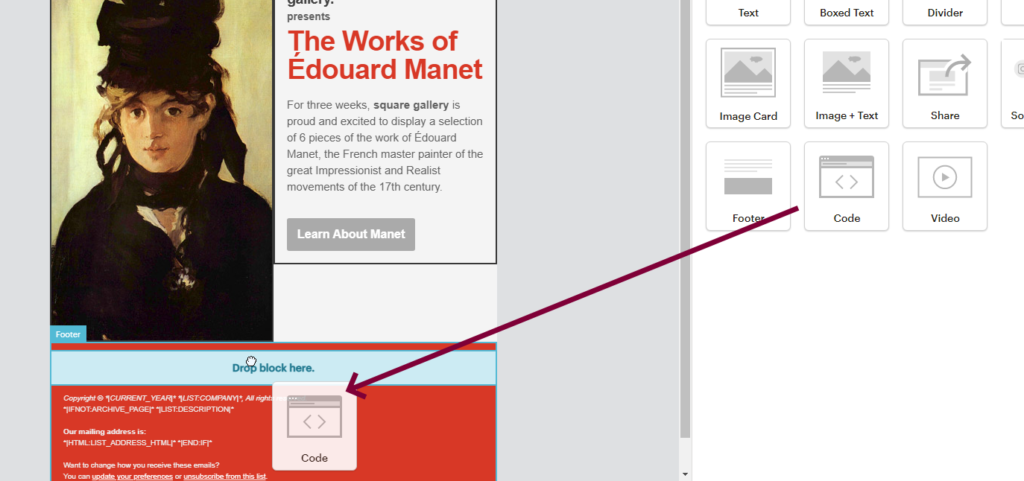
Mailchimp will prefill the container for you:
<div class="mcnTextContent">Use your own custom HTML</div>Add the image as custom HTML as follows (use your own domain, duh):
<img src="https://mymautic.joeykeller.com/*|EMAIL|*/*|FNAME|*/*|LNAME|*/seed/">This image will add the ‘seed’ tag for our contact in Mautic. For the full Token list (Or How Mailchimp calls it: Mail Merge Tags) click here.
For other email services you have to adapt the tokens only, it is not rocket science, I’m sure you can do it.
You can download the whole script by registering here (free), or by in into your download area.

Mike
says:
Great article and super super helpful. Well done and thanks Joey!!
max jaramillo
says:
Hello Joey … is there a callback url for the API settings? Looks awesome.
jos0405
says:
Hey, thanks. what do you mean by callback url? What would that achieve?
miamiman
says:
Sorry saw option in the API settings. Thought to ask.
So far, logs show the creation of the dudetest@test.com but no such contact found in Mautic. I have reviewed the API settings and have cleaned cache.
Does the file structure affect anything?
Installation is at public_html/mautic/ …
jos0405
says:
The logs captures the data you submitted, not the creation of the contact in Mautic. Did you fill out url/login/psw?
miamiman
says:
Answering my own posts, but yes … you need to keep in mind the full structure of where the mautic installation resides!
miamiman
says:
Ok, I have fired the test pixel and recorded the new contact in my Mautic install. Yeah.
However when testing from the mail server, it’s not recording those new or existing contacts with the dynamic data in the form of:
>
Should the url include the full folder? should the folder point to the above /px/ folder? Thanks.
Is the url the route to the /px/ folder above?
Niels
says:
Hi miamiman,
I have the same issue … the contact is not arriving in mautic.
What are you meaning with ** you need to keep in mind the full structure of where the mautic installation resides!** ?
THX for your help.
Best wishes
Niels
jos0405
says:
Hi you need to make sure the contact is publicly updatable in your custom field settings.
miamiman
says:
Hello Joey,
Another question.
Some of my Name fields come back with “%20”
How do I set the tracking pixel to be url encoded (%20 for spaces, %40 for @, etc)?
Thanks,
jos0405
says:
Hi, sorry for the late answer. You can urldecode that string:
urldecode($firstname) for example
miamiman
says:
Thanks!
Another question … if the custom field is set to be NOT publicly editable, will the contact data be created in the case the contact is NEW?
miamiman
says:
I’m asking about the publicly editable field because I’m getting duplicates on unique email as ID.